Compression socks offer a multitude of benefits for circulation, swelling, and various other conditions. However, their snug fit and sturdier materials can make putting them on a challenge, especially for people with limited mobility or dexterity issues. This guide will break down the reasons why compression socks can be tricky to put on and offer step-by-step instructions for overcoming these difficulties. We'll explore techniques suitable for different situations, including putting on socks for the elderly, after surgery, or with the help of assistive tools.
Why Is It so Difficult to Put on Compression Socks?
The very features that make these socks beneficial also contribute to the difficulty of putting them on.
Graduated Compression: The tighter fit at the ankle and foot creates resistance when you try to slide the sock on.
Tight fit: Unlike regular socks, compression socks are designed to be snug against your leg. This tightness provides the squeezing action that improves circulation, but it also makes them harder to pull up.
Material: Compression socks are often made from thicker, sturdier materials to maintain their shape and compression level. This can make them less flexible and more challenging to maneuver.
Dexterity: Putting on socks often requires bending over and manipulating your feet. This can be difficult for people with limited mobility, arthritis, or those recovering from surgery.
While these factors make compression socks a bit tricky to put on, the benefits they offer for circulation, swelling, and other conditions often outweigh the initial struggle. There are also techniques and tools like sock aids that can make the process much easier.
How to Put on Compression Socks for Elderly
Putting on compression socks can be tricky, especially for elderly people. Here's a breakdown of steps to make it easier:
Preparation:
Sitting down: Have the elderly person sit in a comfortable chair with their legs bent at a 90-degree angle. This relaxes the leg muscles and makes the sock easier to slide on.
Identify the sock: Compression socks often have a designated heel. Ensure the heel is facing the person when laying the sock flat.
Putting on the sock:
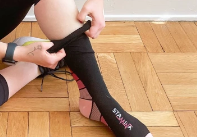
Inversion: Turn the sock inside out, bunching the material up to the heel. This creates a wider opening for the foot.
Foot insertion: Slide the foot, toes first, into the sock. Gently guide the heel of the foot into the sock's heel pocket.
Bunch and pull: With both hands, firmly grasp the bunched material around the ankle. Holding it bunched, gently pull the sock up the leg, smoothing out any wrinkles as you go.
Adjust and check: Once the sock is fully on, ensure it feels comfortable and there are no folds or bunching. The sock should be snug but not constricting.
Additional Tips:
Use gloves: Wearing rubber gloves can improve grip and make pulling the sock easier.
Assistance: Offer help if the elderly person has difficulty bending or reaching their feet.
Donning aids: Consider using a stocking aid tool. These are long, fabric loops that help you pull the sock up without bending too much.
Open-toed options: If dexterity is a concern, open-toed compression socks are available. These allow for easier application without having to manipulate the toes.
How to Put on Compression Socks Youtube Video
How to Put on Compression Socks After Hip Surgery
Putting on compression socks after hip surgery requires extra care due to limited mobility. Here's how to do it safely:
Preparation:
Gather supplies: You'll need a plastic bag (like a grocery bag), cornstarch or baby powder (optional), and someone to assist you (ideally).
Pre-wear:
Clean and dry: Ensure your leg is clean and dry. Compression socks won't go on smoothly over sweaty or damp skin.
Consider powder: Apply a light dusting of cornstarch or baby powder to your foot and ankle if needed. This can reduce friction and make sliding the sock easier.
Putting on the sock:
Plastic bag trick: Place the plastic bag over your foot, covering it entirely.
Sock inversion: Turn the compression sock inside out, bunching the fabric up to the heel.
Sock positioning: While holding the bunched sock, position the heel pocket over the plastic-covered heel of your foot.
Slide and gather: Carefully slide the sock body up your leg, using the plastic bag to help it glide smoothly. Gently pull the bunched material at the ankle to distribute the sock evenly.
Plastic removal: Once the sock is almost fully on, carefully pull the plastic bag out from the toes, easing the sock further up your leg.
Smooth and adjust: With the sock fully on, smooth out any wrinkles and ensure it feels snug but comfortable. There shouldn't be any bunching or constriction.
Additional Tips:
Supportive surface: Sit on a chair with a raised surface for your leg if bending is difficult. This can be a stool or a stack of pillows.
Assistive tools: Consider using a stocking aid device. These are long fabric loops that help you pull the sock up without excessive bending.
Gradual approach: If your hip is very sore, pull the sock up in stages. Slide it up a few inches at a time, rest, and then continue.
Doctor's instructions: Always follow your doctor's specific instructions regarding compression sock use after surgery.
How to Put on Compression Socks with Arthritis
Arthritis in the hands and wrists can make putting on compression socks a challenge. Here are some tips to make it easier:
Preparation:
Timing: Put on your socks first thing in the morning when your legs are least swollen.
Sitting down: Sit in a comfortable chair with good back support. Elevate your leg on a stool or stack of pillows if bending is difficult.
Making the socks easier to handle:
Glove up: Wear rubber gloves to improve grip and make pulling the socks easier.
Donning aids: Invest in a stocking aid tool. These are long fabric loops or handles that help you pull the sock up without straining your hands or bending too much.
Sock inversion: Turn the sock inside out, bunching the material up to the heel. This creates a wider opening for your foot.
Putting on the sock:
Foot first: Slide your foot, toes first, into the sock. Gently guide the heel of your foot into the sock's heel pocket.
Bunch and pull: With both hands (or using the stocking aid), firmly grasp the bunched material around the ankle. Gently pull the sock up your leg, smoothing out any wrinkles as you go.
Additional Tips:
Lubricate: Apply a light dusting of cornstarch or baby powder to your leg and ankle. This reduces friction and makes the sock slide on more easily. Be careful not to use too much, as it can become clumpy.
Open-toed options: If dexterity is a major concern, consider open-toed compression socks. These allow for easier application without manipulating the toes.
Start from the toes: If pulling the entire sock is difficult, try putting on a sock liner first, then follow with the compression sock by grabbing the sock higher up on the leg.
How to Put on Compression Socks with Sock Aid
Here's how to put on compression socks with a sock aid:
Preparation:
Gather supplies: You'll need your compression socks, a sock aid, and a chair to sit on.
Sock positioning on sock aid:
Place the sock aid: Put the sock aid on your lap with the open end facing you.
Slide on the sock: Slide the compression sock onto the sock aid. Make sure the heel of the sock is positioned over the curved bottom of the sock aid, and the toes are at the open end.
Adjust the sock: Pull the sock up the sock aid until the heel covers the opening completely. Smooth out any wrinkles in the sock as you go.
Putting on the sock:
Sitting position: Sit comfortably in a chair with your leg extended slightly in front of you.
Foot insertion: Slide your foot, toes first, into the opening of the sock aid. Push your foot all the way down until your toes touch the end of the sock.
Pulling with handles: Grab the handles of the sock aid firmly. These are usually located on the sides or near the top of the aid.
Gently pull: Begin pulling the handles of the sock aid slowly and evenly. As you pull, the sock will slide up your foot and leg.
Adjust and smooth: Once the sock is fully on your leg, adjust the positioning if needed and smooth out any wrinkles.
Additional Tips:
Sock aid types: There are different sock aid designs. Some have long fabric loops instead of handles. The basic steps remain similar - position the sock, insert your foot, and pull the loops to slide the sock up.
Sock inversion (optional): For some sock aids, inverting the sock (turning it inside out) before placing it on the aid might be easier. Experiment and see what works best for you.
Start from the toes (optional): If you have difficulty pulling the entire sock up at once, consider putting on a regular sock liner first. Then, use the sock aid to pull the compression sock up from a higher point on your leg.
By following these steps and finding the technique that works best for you, using a sock aid can make putting on compression socks a breeze.
Is There a Tool to Help Put on Compression Socks
Yes, there are tools to help you put on compression socks. These are called stocking aids and they come in a few different designs.
Loops: These are long fabric loops that you grab and pull to slide the sock up your leg.

[Image of Stocking aid loop]
Handles: These have handles on the sides or near the top of the aid that you pull to slide the sock up your leg.

[Image of Stocking aid handles]
Sleeve with a stiff sole: These slide over your foot and up your leg, with the sock bunched around the sleeve. You then pull the sleeve off, leaving the sock in place.

[Image of Stocking aid sleeve]
Stocking aids can be a great help for people who have difficulty bending over, have limited mobility, or have weak hands.
What Not to Do with Compression Socks?
- Don't fold or roll down the tops: This creates uncomfortable pressure and can potentially restrict blood flow.
- Don't wear them for extended periods without breaks: While they are meant to be worn for a certain period each day, consult your doctor about recommended wear time and take breaks as needed.
- Don't wear them if you have certain skin conditions or allergies: Compression socks may irritate some skin conditions. If you have any concerns, talk to your doctor.
- Don't wear them if your doctor has advised against it: There might be certain medical reasons why compression socks aren't suitable in some cases. Always follow your doctor's instructions.
- Don't put them on over lotions or creams: Lotions can affect the material and make the socks difficult to put on. Apply lotion after you've removed the socks.
- Don't dry them with heat: Heat can damage the elasticity of the compression socks. Let them air dry at room temperature.
Should Compression Socks Leave Marks?
Light marks from compression socks are generally normal, but there are some things to consider:
Cause of Marks: Slight indentations on your skin from the elastic band at the top of the sock or faint vertical lines from the sock's structure are usually nothing to worry about.
Severity of Marks: If the marks are deep or cause discomfort, redness, or irritation, then the socks might be too tight.
- Here's a guideline
Acceptable Marks: Light, temporary indentations that disappear within an hour or so of taking off the socks are likely harmless.
Concerning Marks: Deep red marks, irritated skin, or marks that don't fade within a reasonable time indicate the socks might be too tight.
- What to Do
Monitor: If you're unsure, wear the socks for a week and see if the marks lessen.
Sizing Up: If the marks persist or cause discomfort, consider going up a size in compression socks.
Doctor's Advice: If you have concerns or any underlying medical conditions, consult your doctor for guidance on using compression socks.
Remember, compression socks should feel snug but not constricting. They should improve circulation, not restrict it.
How Many Hours a Day Should You Wear Compression Stockings?
For many people, wearing compression stockings during the day and taking them off before bed is recommended. This ensures optimal circulation benefits throughout the day while allowing your legs to rest at night.
In some cases, your doctor might recommend wearing them for longer durations or even 24 hours a day, especially for conditions that worsen at night or during long periods of inactivity.
How Far up the Leg Should Compression Socks Go?
The length of compression socks depends on the type and your specific needs.
Knee-high: These are the most common types. They extend from the toes up to just below the knee bend. They are suitable for addressing leg swelling, minor varicose veins, and blood circulation concerns.
Thigh-high: These extend all the way up to the thigh, often reaching the groin area. They are used for more severe swelling, lymphedema (fluid buildup), and some post-surgical recovery needs.
Pantyhose: These are essentially tights with compression. They cover the entire leg and torso. They are used for conditions like severe lymphedema or abdominal swelling.
How Long Does It Take for Compression Socks to Work?
Compression socks can provide some benefits right away, but it depends on what you're hoping to achieve.
- Immediate relief: You might feel a squeezing sensation that improves circulation and reduces achiness or tiredness in your legs as soon as you put them on.
- Reduced swelling: It may take a few days or even weeks of consistent wear to see a noticeable difference in swelling, especially for conditions like varicose veins.
Can You Wear Lotion with Compression Socks?
You can wear lotion with compression socks, but there are a few things to keep in mind:
Let it dry completely: Apply lotion to your legs and allow it to absorb fully before putting on your compression socks. This prevents the lotion from making the stockings slippery and difficult to put on.
Consider the type of lotion: Avoid greasy or heavy lotions that might weaken the fabric of the stockings. Look for lightweight, fragrance-free lotions that absorb quickly.
Check for latex: If your compression socks contain latex, it's best to avoid lotion altogether or consult your doctor for recommendations on safe alternatives.
You can use silicone lotion or cornstarch as an alternative to regular lotion to aid with putting on the socks. Some manufacturers even offer special compression-friendly lotions designed for use with these garments.
Should I Get Knee-High or Thigh High Compression Stockings?
Choosing between knee-high and thigh-high compression stockings depends on your specific needs and medical condition.
- Knee-high
Pros: Easier to put on and take off, generally more comfortable for daily wear, good for addressing issues below the knee (ankle swelling, mild varicose veins).
Cons: Might not be suitable for conditions affecting thighs or above the knee (lymphedema, severe varicose veins).
- Thigh-high
Pros: Offers graduated compression throughout the entire leg, beneficial for conditions above the knee, potentially more effective for preventing DVT (deep vein thrombosis).
Cons: Can be more difficult to put on and take off, might be less comfortable for extended wear, may be unnecessary if your concerns are solely below the knee.
Here are some additional factors to consider:
Your doctor's recommendation: Consulting a healthcare professional for personalized advice based on your medical history is crucial.
Severity of your condition: For milder issues, knee-highs might suffice. For more severe concerns or post-surgical situations, thigh-highs could be necessary.
Comfort level: If you prioritize comfort for daily wear, knee-highs might be a better choice.
Final Words
While putting on compression socks may require some initial effort, the techniques and tools outlined in this guide can significantly ease the process. Remember, the benefits of improved circulation and reduced swelling often outweigh the initial struggle. With a little practice and the right approach, you'll be enjoying the advantages of compression socks in no time.
Read More:
How to Measure for Compression Socks
How Do Compression Socks Work
Why Do My Legs Ache After Wearing Compression Socks
How to Put On Compression Socks
When to Put on Compression Socks for Flying
Are Flight Socks the Same as Compression Socks


